This article applies to ScreenBeam 1xxx-Series and 960 products.
Wireless display has become an essential part of modern classrooms, meeting spaces, and active learning environments. When paired with a touchscreen display or interactive flat panel (IFP), Windows Miracast Touchback allows you to not only mirror your Windows desktop wirelessly but also control the PC directly from the display, and including touch gestures, inking, and annotation.
This guide explains how the feature works, prerequisites, setup steps, and recommended best practices to ensure a smooth experience.
1. What Is Miracast Touchback?
Miracast is a wireless display technology built into Windows 10 and 11. When connected to a ScreenBeam receiver that supports HID (Human Interface Device) over Miracast, Windows enables Touchback, which means:
-
Touch gestures on the display are sent wirelessly back to the PC
-
Pen or finger inputs act as if you touched the laptop screen
-
Inking functions in Microsoft Office, Whiteboard, Edge, Adobe apps, etc.
-
Multi-touch interactions (zoom, drag, rotate) are supported
Touchback transforms a normal wireless display session into a fully interactive experience—ideal for teaching, digital whiteboarding, product demos, and collaborative work.
2. Requirements for Miracast Touchback
To use Touchback and inking through ScreenBeam, ensure the following requirements are met:
Windows PC
-
Windows 11 build or minimum Windows 10 version 1607
-
Latest drivers installed (especially WLAN and GPU)
Display + ScreenBeam Receiver
-
Touchscreen or IFP with USB-B upstream touch connection
-
ScreenBeam models that support HID over Miracast
-
HDMI Cable (included with a ScreenBeam)
-
USB Type-A cable to the touchscreen
Network
-
Refer to the Best Practices for Miracast or Infracast
3. How to Connect ScreenBeam for Wireless Touch & Inking
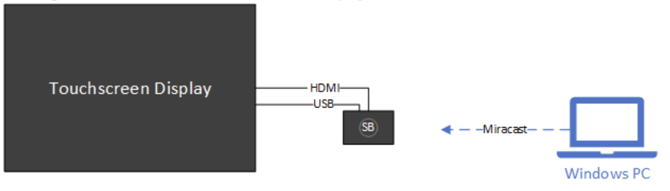
Step 1 — Connect Touchscreen USB to ScreenBeam
-
Locate the USB Type-B or Type-C TO PC port on the interactive display.
-
Connect this port to the USB Touch port on the ScreenBeam receiver (USB-A).
-
The display will now send touch signals to the receiver.
Step 2 — Connect ScreenBeam HDMI to Display
Ensure the ScreenBeam is connected to the display using HDMI
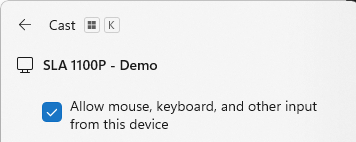
Step 3 — Connect Windows 11/10 PC via Miracast
On your Windows device:
-
Press Windows + K
-
Select your ScreenBeam receiver
-
Choose Allow mouse, keyboard, and other input from this device when prompted
- The message "Windows PC is loading the touchscreen device drivers. Please wait." appears on the touchscreen display and Windows will automatically enable Touchback.
Step 4 — Test Touch and Pen Input
Try the following on the touchscreen:
-
Tap to select icons
-
Use two fingers to scroll or zoom
-
Open Microsoft Whiteboard and try inking
-
In PowerPoint, use the pen tool during slideshow
If everything is configured correctly, your PC will behave as though you interacted with it directly.
Additional References